


8 DIY Chair Caning Ideas
Chair caning is a great way to add a unique and interesting look to an old chair you have in your home. Caning can be used to cover anything from an antique armchair to a modern dining chair, giving it a whole new life! And the best part of chair caning is that it’s incredibly easy to do. With some basic supplies and instructions, you can transform any old piece of furniture into something special. We’ve put together 8 DIY chair caning ideas that will help you get started with your own project. From weaving patterns to creative designs, there’s something here for everyone!
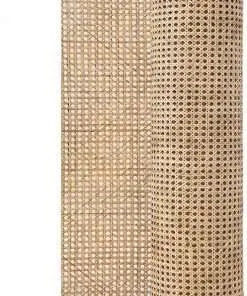
Traditional Caning
1. Traditional Caning
This is the most common type of caning, and what most people think of when they hear the word “caning”. It involves weaving strips of cane in a crosshatch pattern, with each strip going over and under the adjacent ones. The end result is a sturdy, tight seat that will support a lot of weight.
Traditional caning is usually done with machine-woven cane, which is more uniform in thickness and width than hand-woven cane. This makes it easier to achieve a tight, consistent weave. However, hand-woven cane can also be used for traditional caning – it just takes a bit more patience and skill to get the right results.
If you’re interested in trying traditional caning, there are plenty of online tutorials and resources to help you get started. Once you’ve got the hang of it, it’s really not that difficult – and you’ll end up with a beautiful, one-of-a-kind chair!
Herringbone Caning
Herringbone caning is a popular technique for caning chairs. It is a little more challenging than regular caning, but the results are definitely worth it!
To do herringbone caning, you will need to start with a square piece of cane. Cut the cane into strips that are about 1/2 inch wide and 3 feet long. You will need about 12 strips for a standard chair seat.
Soak the strips in water for 30 minutes. This will make them pliable and easier to work with.
Start at the center of the seat and begin weaving the cane strips in a herringbone pattern. To do this, alternate between going over and under the other strips. When you get to the end of a strip, tuck it under the next strip to secure it.
Continue until you have covered the entire seat. Once all of the cane strips are in place, trim off any excess and use a damp cloth to lightly press down on all of the seams. Allow the chair to dry overnight before sitting on it.
Diamond Caning
1. Diamond caning is a type of chair caning that creates a diamond-shaped pattern.
2. It is achieved by weaving the caning material over and under vertical and horizontal wires.
3. Diamond caning is often used for decorative purposes, as it creates an intricate and eye-catching pattern.
4. However, it can also be used for functional purposes, such as providing added support to a chair with a weak or damaged seat.
5. If you are interested in trying your hand at diamond caning, there are a few things you should keep in mind.
6. First, because of the way the diamond pattern is created, this type of caning requires more material than other types of caning.
7. As such, it is important to have enough caning material on hand before starting your project.
8. Second, diamond caning can be somewhat time-consuming, so be sure to set aside enough time to complete the project before starting.
9. Finally, while diamond caning may seem daunting at first, it is actually quite simple once you get the hang of it. With a little patience and practice, anyone can master this technique!
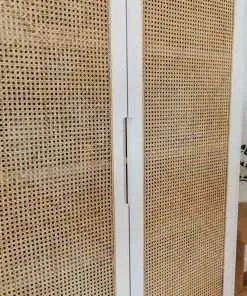
Basket Weave Caning
Basket weave caning is a popular technique for caning chairs. It involves weaving the cane in and out of the chair’s seat to create a basket-like pattern. This type of caning is relatively easy to do and results in a sturdy, attractive seat.
Serpentine Caning
If your chair has a lot of curves, you may want to try serpentine caning. This method is similar to the traditional caning method, but the holes are drilled in a curved pattern. You will need to use a special jig to drill the holes in the correct pattern. Once the holes are drilled, the cane is woven in and out in a zig-zag pattern. Serpentine caning can be tricky, so it may be best to leave this method to the professionals.
Square Stitch Caning
1. Square Stitch Caning: This is a very popular type of caning and is often seen in chairs from the Victorian era. It is created by weaving cane strips around vertical and horizontal wires in a square pattern.
2. Herringbone Stitch Caning: This type of caning gets its name from its similarity to the herringbone pattern often seen in fabrics. It is created by weaving cane strips around vertical and horizontal wires in a zigzag pattern.
3. Basketweave Stitch Caning: As the name suggests, this type of caning creates a basket weave pattern. It is created by weaving pairs of cane strips over and under each other in a crisscross pattern.
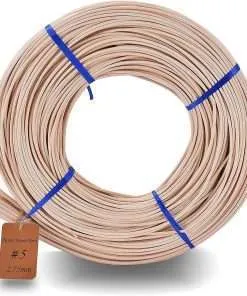
Round Reed Caning
Round reed caning is one of the most popular types of chair caning. It is a classic look that has been around for centuries. Round reed caning is made from strips of reed that are hand-woven together to form a tight, sturdy seat.
Round reed caning is fairly easy to install yourself, and it is also one of the more affordable options when it comes to chair caning. If you are looking for a traditional option that will give your chairs a timeless look, round reed caning is a great choice.
Continuous Strand Wicker
1. Continuous Strand Wicker: This type of chair caning is made from a long, continuous strand of wicker. It’s often used on chairs with big, open weave patterns. To do this type of caning, you’ll need to start in the middle of the seat and work your way out to the sides.