
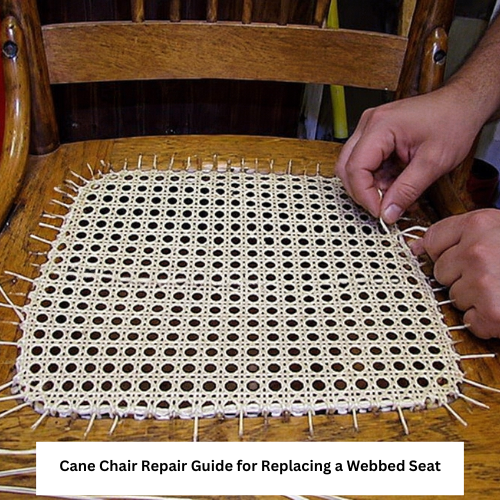
A successful cane chair repair starts with identifying the seat construction, measuring the opening, and buying webbing and spline that fit the existing groove. Pressed cane seats are repaired differently from hand-caned seats, so the first step is confirming which type of chair you own.
This guide explains how to remove damaged webbing, clean the groove, prepare replacement cane seat material, install the new panel, secure it with spline, and avoid common chair caning DIY mistakes. It also covers maintenance, troubleshooting, safety, and what to verify before buying supplies.
Confirm That the Chair Uses Pressed Cane Webbing
A pressed cane seat normally has a continuous groove routed around the perimeter of the seat opening. A prewoven cane panel is push into this groove and held in place with reed spline and adhesive.
A hand-caned seat normally has individual holes drilled around the opening. Strands of cane pass through those holes to create the woven pattern.
Do not try to install pressed cane webbing in a chair designed for hand caning unless the frame is professionally modified. Cutting a new groove can weaken or permanently alter an antique chair.
| Seat construction | How to identify it | Normal repair method | Main buying requirement |
| Pressed cane seat | Continuous groove around the opening | Replace the prewoven panel and spline | Webbing width, groove size, and spline fit |
| Hand-caned seat | Individual holes around the opening | Reweave individual cane strands | Strand size, hole spacing, and weaving pattern |
| Woven rattan seat | Material wrapped around rails or frame | Reweave or replace wrapped strands | Strand type, width, and frame design |
| Upholstered seat | Fabric and padding cover a seat board or frame | Upholstery repair | Fabric, foam, fasteners, and support |
| Damaged wooden frame | Cracks, loose joints, or broken rails | Structural repair before caning | Wood condition and professional assessment |
Do not sit on a chair with a cracked rail, separated joint, loose leg, damaged groove, or unstable frame. The structure must be sound before the seat is replaced.
Planning a Cane Chair Repair
Remove the old seat material only after taking photographs and measurements. Photos can help you remember where the spline joint was placed, how the webbing pattern was aligned, and how the groove looked before cleaning.
Measure the opening at several points. Older chair frames may not be perfectly square or symmetrical.
Record:
- The widest part of the seat opening
- The deepest part of the seat opening
- The width of the routed groove
- The depth of the groove
- The distance around the complete groove
- The direction of the cane pattern
- The size and condition of the old spline
- Any repaired, cracked, or missing wood
Buy a webbing panel larger than the opening so there is enough material to press into the groove and trim after installation. Do not cut the panel to the exact opening size before fitting it.
Tools and Supplies for Cane Chair Seat Repair
The exact tools depend on the chair, groove, old adhesive, and replacement kit.
Common supplies may include:
- Replacement pressed cane webbing
- Correctly sized reed spline
- Caning wedges
- Caning chisel
- Utility knife with a sharp blade
- Small hammer or mallet
- Wood glue approved for the chair and caning system
- Measuring tape
- Caliper for checking the groove
- Soft brush
- Pliers
- Clean towels
- Water container when soaking is required
- Eye protection
- Cut-resistant work gloves
- Dust protection when removing dry adhesive or debris
A caning chisel for reed spline removal can help lift old spline from the groove, but the tool size and cutting edge check against the chair before use.
Choosing Replacement Cane Webbing
Pressed cane webbing is sold in different widths, lengths, weave patterns, materials, and opening sizes. Match the replacement to the original appearance when restoration accuracy matters.
A fine open cane webbing roll may work for multiple chair projects, but buyers should verify its usable width, pattern, material, and required spline before ordering.
Natural cane webbing
Natural cane can provide a traditional appearance and may tighten as it dries after installation. Follow the supplier’s soaking and preparation instructions.
Do not over-soak natural material. Excess soaking can weaken fibers, cause discoloration, or make handling more difficult.
Synthetic cane webbing
Synthetic webbing may resist some moisture-related changes, but it may not tighten or accept finishing products in the same way as natural cane.
Use spline and adhesive that are compatible with the synthetic material and the chair frame. Verify before buying.
Pattern alignment
Place the panel over the seat before installation and rotate it until the pattern looks straight relative to the front and sides of the chair.
A pattern that is slightly crooked at the beginning can appear much more noticeable after the spline is installed.
Choosing the Correct Spline
The spline must fit the groove together with the thickness of the webbing. The old spline can provide a reference, but it compressed, swollen, damaged, or incorrect from an earlier repair.
Measure the cleaned groove rather than relying only on the old material.
A spline for cane chairs should press the webbing securely into the groove without requiring enough force to split the surrounding wood.
Do not use a spline that sits loosely in the cleaned groove. It may fail to hold the seat.
Do not force an oversized spline. Excessive hammering can damage the groove, webbing, or chair frame.
When uncertain between sizes, obtain small samples or contact the supplier with the groove measurement, webbing thickness, chair model, and photographs.
Preparing the New Webbing
Read the material instructions before wetting the panel. Natural cane and synthetic cane may have different preparation requirements.
When soaking is required:
- Use clean water.
- Follow the supplier’s recommended duration.
- Keep the material supported.
- Do not crease or sharply fold it.
- Remove excess surface water before installation.
- Keep the pattern aligned.
Lay the webbing over the seat opening with an even margin on every side.
A 24 inch pressed cane webbing kit may suit a larger seat or provide additional trimming room, but confirm the actual chair opening, webbing pattern, spline size, and included materials before buying.
Common Buying Mistakes
Avoid these common errors:
- Buying webbing before measuring the seat
- Confusing pressed cane with hand caning
- Matching spline only to the old compressed piece
- Ordering webbing too narrow for the opening
- Ignoring the weave pattern
- Mixing natural webbing with incompatible synthetic spline
- Buying a kit without checking the spline size
- Using a general woodworking chisel that is too wide
- Forgetting trimming and fitting allowance
For another product comparison, review the pressed cane webbing kit with splines and instructions and verify the current mesh size, spline size, included tools, and return terms.
Conclusion
A reliable cane chair repair depends on correct seat identification, careful measuring, clean groove preparation, compatible webbing, and properly fitted spline. Work slowly, protect the wooden frame, and allow the adhesive and natural cane to dry fully before use. Cane weaving supplies gives DIY furniture repair buyers relevant webbing, spline, tools, and kits to compare for a woven chair repair project.
FAQ
Can I replace a cane chair seat without removing the old spline?
No. The old spline and webbing must normally be removed so the groove can be cleaned and inspected.
How much extra cane webbing should I buy?
Buy a panel larger than the seat opening so enough material remains for pressing into the groove and trimming. Verify the required margin with the supplier.
Can I use the old spline again?
Reusing old spline is generally not recommended because it may be compressed, damaged, brittle, or covered with adhesive.
Does pressed cane webbing need to be soaked?
Some natural webbing requires soaking, while synthetic material may not. Follow the instructions for the exact product.
When can I sit on the repaired chair?
Wait until the webbing is dry and the adhesive has cured for the full time stated by the manufacturers.
